
How to record bagpipes
The purpose of this article is to show how to record bagpipes and how to do so on a budget. This article isn’t going to delve into an audiophile method, but rather focus on a simple and effective way to get practical recordings that are easy to do and work for home recordings.
First off, I have had a few years experience as a recording engineer. I ran a semi-pro recording studio; I have spent many hours recording singers, synthesizers, and bands. That being said, you don’t need to be a recording engineer to get a good quality bagpipe recording. If you follow a few basic rules, you can make your recordings sound good.
Due to the advent of online competitions for bagpiping, the need for bagpipe recordings grew. Also having a simple recording setup can help you easily send quality recordings over to instructors, bandmates, and others to get feedback in your playing.
Make no mistake about it—a poor recording will make a good performance tedious to listen to. And although judges are supposed to be objective, in my personal opinion a good recording will give you an edge over a poor recording from the very start. After all, first impressions are lasting impressions. Don’t have the initial drone strike-in immediately make your listeners cringe right away. Give them a good impression with a recording that is adequate.
Although there are MANY ways to go about recording bagpipes, this article will show you an easy and cheap way to do so…
What Do You Need to Record a Bagpipe?
- A computer with a USB port
- Recording Software*
- USB mic
- Mic Stand
*Since I am a “Mac guy” this article will focus on using Mac software, but a simple google search will yield alternative recording software for non-Mac computers. You will also need to be able to adjust your PC’s input volume; this article shows you how to easily do so.
Most of us already have computers with a USB port; any kind will do.
For recording software, if you are using a Mac you can use Voice Memos to record an audio file for free or QuickTime for video.
I love Voice Memos. It’s so easy to use. You can trim the beginning and ends of the audio file, which is perfect if you want to trim out unnecessary parts, such as a long intro, tuning, or a bad take. You can text, email, or save the file, or import it into Anytune (if you don’t know about Anytune by the way, check it out; it’s great for music practice).
Although I’m not the biggest fan of QuickTime, it is free and native to Mac (it requires no download from a 3rd party). I have not found any other suitable software that is a free and simple substitute, so I just stick with QuickTime to get the job done. If you know of another one that is better, please email me a suggestion.
As for a USB mic, since I recently moved and temporarily packed my recording studio, I needed a new mic for recording bagpipes that was simple and easy to use. This was to be unlike my original setup that consisted of a multitude of cables, an expensive microphone, and an expensive converter. Because simplicity was my overall desire, I chose a Blue Yeti USB microphone (works with Windows 10 or higher, macOS 10.13 or higher).
Although marketed as a regular microphone, it actually does many things, such as amplification, conversion, gain control, and polar pattern selection. I’ll explain all that later (and why it makes it a great and simple solution).
Of course, any USB microphone will do.
The last thing you should consider getting is a microphone boom stand. The Blue Yeti has a thread built into its casing (therefore no external mount is necessary). I like to use the mic stand to position the mic about head height, at about a 15 degree angle downwards (see pic at the top). Because the microphone is higher and closer to the drones, it “captures” more of the sound of the drones and not too much chanter.
Aside from the physical setup and some knowledge of how to use whatever recording software you will use, the MOST IMPORTANT part of the recording is coming up, so pay special attention.
The biggest culprit in a poor bagpipe recording, aside from using a phone or laptop speaker, is messing up the gain staging.
What is gain staging?
Gain staging is like the amount of flow that exists in a pipeline. If there is too much flow in a pipeline, the pipe will swell and can eventually burst.
In digital recording, too much gain produces distortion. Digital distortion sounds very bad; and the more the gain the more the distortion, and the more horrible it will sound.
So how do you know where the threshold is?
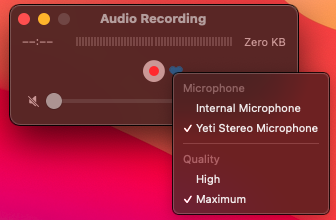
With the Yeti plugged into the USB port with its cable, on a Mac go to: Settings, Sound, click Input, and select "Yeti Stereo Microphone" (for PC refer to this). This will give you the option to control the volume input sensitivity. By default, the Mac settings will be WAY TOO sensitive for the bagpipes and the Yeti. After all, the bagpipe is the loudest instrument in the universe…
So here’s the magic trick, adjust the input volume of the microphone to about 10% of the slider (see image below). By doing this, you will raise the threshold so that the bagpipe won’t distort the recording.

Now as mentioned before, this process is called gain staging. But this is actually the last stage in the process. The first stage of the process is to adjust the gain of the microphone. This will control how much signal that is sent to the computer. For my recording I adjusted the microphone gain all the way up, past 5 o’clock.
In my procedure, I wasn’t very scientific (which is what audio engineers are supposed to do). I did not test to see where the optimal adjustment of the microphone’s gain to the input volume of the Mac’s sound setting in order produce the best sound recording. (Sorry). The purpose of this was to make a simple, easy, quick recording, not to be an insane audio engineer obsessing over how to get the perfect sound. (And by all means experiment to see if you can make a better sound recording if you want to). However the recording I did with the aforementioned settings will produce an adequate recording.
Once the gain of the microphone and input volume of the Mac sound settings are set, you can now leave them set that way so that you can “set it and forget it”, never having to reset it again. The Mac OS will remember where you last left the input volume of your USB microphone settings. Hooray.
To show all this in effect you will see in your Sound window the input volume be within proper range when you produce sound into the microphone. Ideally you want to get your volume input somewhere around 50%-75% when playing your instrument. Even if it’s a little lower that’s ok. The main thing is NOT TO GO OVER! Less is safer than more when getting the signals right, because you NEVER want to go over that threshold or you will produce digital distortion!
IMPORTANT! Now back to your recording software… make sure that you tell the software to use the USB microphone as your “input.” If you don’t, it may default to your computer microphone. Boo! Hiss!
(In QuickTime, you can select your input by clicking the down arrow next to the play button, then select Yeti USB Mic):
IMPORTANT! As for Voice Memos, one of its flaws that I was just reminded of, while doing a recording today (right after writing this blog no less), is that for some reason its threshold is a little lower than what the meter shows in Mac Sound Settings. Therefore to avoid distortion you will need to pull back on the gain a little. Since the input volume of the Mac Sound settings is pretty low at 10%, you could pull back the gain of the Yeti to around 2-3 o'clock. That should make a safe recording for Voice Memos. It's a little quirk.
The Yeti features multiple polar patterns: stereo, cardiod, omnidirectional, and bidirectional. Below I’ll discuss what these are.
Again, for my recordings I wasn’t too scientific and used what had worked well enough in the past for recording bagpipes: cardiod.
In simple terms, cardiod, which means “heart”, is just like the shape of a heart: wide on one end and narrow on the other end. Why is this important? Because the microphone can “hear” whatever is in the shape of this pattern. So in cardiod, the microphone hears more in the wide area (the front of the mic) and less in the narrower back end. You usually want to pick up more of the instrument and less of everything else. In recording, not only is the instrument heard by the microphone but so is the “sound” of the room. Too much of the room can make the recording sound poor and very amateur. Ever been in a room without any furniture and stuff in it? It will sound super “reveb-y” (a term I used to like to use a lot to describe a “live” sounding room). That may not be so much of an issue in a professional studio that has been designed to sound well with acoustics, but there’s a good chance your home won’t sound that way.
As for the other patterns…
Stereo: Believe it or not, the Yeti has a 2-in-1 microphone feature. In fact, inside the case, there are 2 microphones. Without getting super technical, those 2 microphones are like 2 ears or eyes that will help give your recording a 3D shape. Just as 2 eyes can show depth in visual perception, so can 2 microphones give a stereo representation of your recording, adding some depth. Although I haven’t used this yet, I suspect that this could give good results for pipe recordings. Try it out yourself.
Omni: in this pattern, the microphone hears “all” around it, with a spherical pattern shape. (Omni actually means all). This could actually be suitable to use if you were playing with other instrumentalists. If you are doing so, have the musicians surround the microphone. Or perhaps you have a nice sounding room and want to capture a little more of the sound of it? Ever hear those nice pipe recordings with nice reverb in it? Don’t be afraid to experiment if you are feeling adventurous.
Bidirectional: in this pattern, the microphone hears in front of it and behind it. This could be a useful application if you are doing a duet with another piper or a snare drum. In this scenario put one person in front, the other behind the mic.
By the way, when recording with other instrumentalists, if you move the instrumentalist closer to the mic they will sound louder or “closer” than the other instrumentalists. You can also move them farther away to lower them. However, if you move them too far away from the microphone, you will get more room sound and less of the instrumentalist.
Lastly, I’m going to briefly describe what a USB mic does (and why I recommend it for easy recordings), because it does a lot more than just act as a microphone. Without a USB microphone, you would need to buy/use a microphone, a mic cable, a mic amplifier and converter or interface. (In short, the USB mic does all of those things and you don’t have to pay separately for each individual one). The mic amplifier powers the mic before sending a signal to a converter. The converter turns the mic signal into digital information for the computer. An interface usually has an amp and converter built into it and contains other features as well. However, with a USB mic you get all you need to be able to make a recording.
Once you are all ready, hit record and have fun. If you don’t feel like experimenting with the gain staging or the polar patterns, the guide that I showed will get you an adequate recording. But if you feel like experimenting maybe you will get something cool sounding. The world could use a wall of sound bagpipe album, perhaps?
Lastly, I want to mention that if you are going to upload your video to YouTube you will have to export the QuickTime file.
Go to: File, export as > 720p.
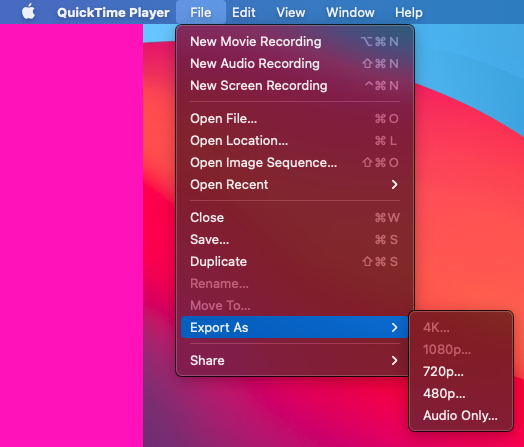
If you save the file without exporting, the audio in YouTube will not work (it will play something called white noise which sounds like hiss). By exporting, it has the added bonus of making the file smaller.
Speaking of file sizes, be very careful of your hard drive space disintegrating while recording videos. It’s not unlikely to have low hard drive space warnings show up, especially in the middle of a piobaireachd (if you don’t have the luxury of having a lot of hard drive space on your computer). What are you going to do? Sacrifice your computer because the crunluaths are coming along well? It’s always good to have a spare hard drive to move files immediately to after your recording session. In fact, it helps to even have a 2nd hard drive to make a 2nd backup (in case the first external drive breaks—it has happened to me several times). Delete immediately any takes you don’t want to keep in order to save space from your computer’s main hard drive. If you have a computer without a lot of space, watch your hard drive space like a hawk. You can view your available storage by: selecting the Apple icon, About this Mac, Storage.
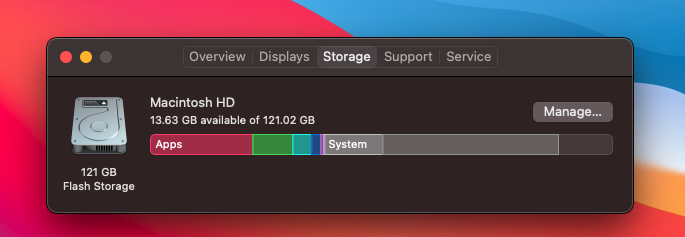
I recommend having at least 20 GB’s of hard drive space available when doing online competitions/videos, deleting bad takes immediately, saving good takes to an external hard drive after your session, and deleting them all from the local when done. Keep an occasional eye out for the low disk space warning window while doing a take.
Happy recording!
Published: February 14th, 2022
Happy Piping. Have any questions? Shoot me an email.